I know this post isn't about a recipe or food, but about some products. This story begins two years ago. For Christmas in 2009 my parents got me an Oster electric cheese grater for Christmas. The place for the cheese was so small you had to cut the cheese way down to even fit it in. Then when you press the cheese against the shredding barrel the motor wasn't powerful enough to even cut the cheese. So I call Oster they sent a new one to me. Tried it, same thing. I gave up and got a Presto Salad Shooter Pro, LOVE IT!
Christmas 2010 rolls around, I need a microwave. So my parents got us one as our gift. You guessed it an Oster. You guessed it again PIECE OF CRAP. It worked about eight months and then just quit. Everything seemed fine, then one day Corey pushed the start button and it died.
I emailed them and complained about their products (graters and microwave). They sent me a number for the microwave division since they are taken care of in a separate department, fine whatever. They also apologized about the two graters. At this point the graters have become a discontinued item. I would assume since they suck they probably had a million complaints. Anyway, they offer to send me any item from their web page up to $40. I pick an electric skillet. It arrives and it seems really nice. Not as nice as I thought. After only three or four uses the non stick coating over the heating element bubbled and is coming off.
Back to the microwave, I pushed it away because I knew they would ask us to send it back. With our financial situation at the time, I knew that would be impossible. Well, even though our situation hasn't changed, I decided to call and see what I would have to do. Since it was purchased in 2010 they couldn't help me, I would have to pay for any repairs. Even though I have sent several emails to them about various issues, she said they couldn't prove I have contacted them so there was nothing she could do for me.
So just take this post as a warning. If you buy an Oster product be sure you are ready to deal with their customer service, probably more then once. As for me, I WILL NEVER BUY AN OSTER PRODUCT AGAIN.
Wednesday, January 18, 2012

Monday, November 14, 2011
Apple Crisp
Last year for Corey's Thanksgiving carry in at work he asked me to make a dessert. I found this recipe online somewhere. It is super simple. I hadn't made it for home, so I hadn't tried it. A couple days ago I made it for a dessert. We ate it warm from the oven. It was so good. I used red delicious, that is what I had on hand. Corey asked me to make peach crisp next time. Hopefully it will be as good as the apple crisp was.

Apple Crisp
Filling
5 or 6 medium apples, peeled, cored and cut into 1/4 inch slices. (about 7 1/2 cups)
3 Tbsp sugar
1 1/2 tsp cinnamon
Topping
1 1/3 cups flour
1 1/3 cups brown sugar
1/2 tsp cinnamon
1 stick butter, softened
2/3 cup finely chopped pecans (optional)
Heat oven to 350 degrees. Prep apples. Add sugar and cinnamon, toss to coat apples. In separate bowl mix all topping ingredients. Using a fork mix until well combined. Spread over top of apples in a 9 inch square pan. Bake for 20 to 25 minutes.
**I just washed and used my hands for mixing the topping.

Apple Crisp
Filling
5 or 6 medium apples, peeled, cored and cut into 1/4 inch slices. (about 7 1/2 cups)
3 Tbsp sugar
1 1/2 tsp cinnamon
Topping
1 1/3 cups flour
1 1/3 cups brown sugar
1/2 tsp cinnamon
1 stick butter, softened
2/3 cup finely chopped pecans (optional)
Heat oven to 350 degrees. Prep apples. Add sugar and cinnamon, toss to coat apples. In separate bowl mix all topping ingredients. Using a fork mix until well combined. Spread over top of apples in a 9 inch square pan. Bake for 20 to 25 minutes.
**I just washed and used my hands for mixing the topping.
Friday, November 11, 2011
Bolognese Sauce

I know it's been a while since I posted. I just sort of fell back into cooking cheap, quick meals. I found this in a magazine and just ripped the page out, so can't remember which one it was in. I have had it on my menu, but just kept pushing it to the back. Today I finally pulled it out and made it. It was good. Corey and I both really liked it. It will be on the menu again in the future.
Bolognese Sauce
1 Tbsp unsalted butter
1 small onion, chopped
1 rib celery, finely chopped
1 carrot, finely chopped
2 Lb lean ground beef
salt and pepper
pinch of nutmeg
1 cup whole milk
1 cup white wine
2 (28 oz) cans crushed tomatoes
Melt butter in a large saucepan over medium heat. Add onion, celery and carrot and cook, stirring until vegetables have softened, about 5 minutes. Turn heat to high, add beef and cook, breaking up with a spoon, until no longer pink, about 5 minutes. Season with salt, pepper and nutmeg. Pour in milk and wine and bring to a boil. Lower heat and cook at a lively simmer until most of the liquid has evaporated, about 15 minutes. Transfer mixture to slow cooker, stir in tomatoes, cover and cook on low for 8 hours. Remove cover, stir and cook until sauce is slightly thickened, about 30 minutes longer.
**The cans of tomatoes I had on hand were 35 ounces each, so I used more two ribs celery and two carrots. It was good but next time I will be sure to get the right size cans.
**This recipe makes a lot of sauce. Since there is just two of us, next time I will cut the recipe in half. Of course I have enough that I am going to vacuum pack the rest into two servings. Yes, there really is that much left.
Monday, October 10, 2011
Southwest Egg Rolls / Avocado Dipping Sauce
This recipe was found at couponqueendiaries.com. It was really good. The sauce was excellent. I have never had an avocado before so didn't really know what to expect. I used my stick blender to make the dipping sauce, because just mashing it seemed still too lumpy to me. I cooked my chicken in my Pampered Chef Micro Cooker, then just shredded it. I only rolled and cooked 7 rolls. I still have plenty of the mixture left for lunch tomorrow. Corey lately hasn't been in the mood for corn. He said it was good but he would like some without the corn sometime. I think next time I will make half with the corn and half with spinach so that we will both be happy.

Southwest Egg Rolls with Avocado Dipping Sauce
2 1/2 cups chicken
1 1/2 cup Mexican blend shredded cheese
2/3 cup corn, drained
2/3 cup black beans, drained
5 green onions, chopped
1 tsp ground cumin
1/4 tsp cayenne pepper
1/4 cup fresh cilantro, finely chopped
1 tsp grated lime peel
1 package egg roll wrappers
vegetable oil
Cook the chicken, shred or cut into chunks. In a large bowl, combine all. Place 1/4 cup of the mixture into the center of a wrapper and roll up. Use a pastry brush dipped in water to seal. Prepare all egg rolls. Heat oil to 375 degrees. Fry 2 to 3 egg rolls at a time for 2 minutes on each side. When golden brown, remove and allow to drain on paper towel.
Avocado Dipping Sauce
1 ripe avocado
1 cup ranch dressing
1 Tbsp fresh cilantro, finely chopped
1 Tbsp lime juice
Peel and mash the avocado. Mix in rest of ingredients.
**I did not use fresh cilantro, I used half as much dried cilantro.

Southwest Egg Rolls with Avocado Dipping Sauce
2 1/2 cups chicken
1 1/2 cup Mexican blend shredded cheese
2/3 cup corn, drained
2/3 cup black beans, drained
5 green onions, chopped
1 tsp ground cumin
1/4 tsp cayenne pepper
1/4 cup fresh cilantro, finely chopped
1 tsp grated lime peel
1 package egg roll wrappers
vegetable oil
Cook the chicken, shred or cut into chunks. In a large bowl, combine all. Place 1/4 cup of the mixture into the center of a wrapper and roll up. Use a pastry brush dipped in water to seal. Prepare all egg rolls. Heat oil to 375 degrees. Fry 2 to 3 egg rolls at a time for 2 minutes on each side. When golden brown, remove and allow to drain on paper towel.
Avocado Dipping Sauce
1 ripe avocado
1 cup ranch dressing
1 Tbsp fresh cilantro, finely chopped
1 Tbsp lime juice
Peel and mash the avocado. Mix in rest of ingredients.
**I did not use fresh cilantro, I used half as much dried cilantro.
Sunday, October 9, 2011
Melting Moments
This is another recipe that I found at bakerlady.wordpress.com. It's a pretty simple recipe, bake the cookies, make the filling, sandwich together. Even though my filling didn't set up right, the flavor was awesome. The only thing I did different was I added a little lime zest to the filling. I will for sure make these again. The blog where I found the recipe, she said on the filling she used 1 cup unpacked sugar instead of the powdered sugar, I think I will try it that way next time.

Melting Moments
13 T butter, softened (if using unsalted butter, add 1/4 teaspoon fine table salt with the butter)
1/3 cup, lightly packed powdered sugar
3/4 teaspoon vanilla extract
1/4 cup cornstarch
1 1/3 cups plus 1 tablespoon all purpose flour
Lemon Filling
3/4 cup, very firmly packed powdered sugar
4 T butter, softened
3 1/2 teaspoons fresh lemon juice
Preheat oven to 300°. Line two large baking trays with parchment paper.
Using an electric mixer or electric hand-held beaters, beat butter, sugar and vanilla together until creamy. Stop the machine and use a spatula to scrape down the side and base of the bowl. Continue beating until the mixture is completely smooth. Add cornstarch and beat until combined. Add flour and beat until just combined. Roll into one inch balls and place on prepared baking sheets. Use a flat surface (such as the base of a glass) to gently flatten the balls to form discs. Press a fork into each disk making small indentations. Bake for about 20 minutes, until cookies are golden on the underside and just firm to the touch. Cool cookies on trays for 10 minutes. Then transfer to a wire rack to cool completely. Make the lemon filling. Place a heaped teaspoon of the filling on the flat side of one biscuit. Top with the flat side of another cookie and gently press together. Repeat with remaining cookies. Store cookies in an airtight container at room temperature, in the refrigerator or freezer.
Lemon Filling
Using an electric mixer or electric hand-held beaters, beat powdered sugar, butter and lemon juice together until smooth and creamy.
**As you can see by the picture the filling didn't set up. Hopefully if you try these, your filling will set up right. If you want to see how they should really look here is the link to the page where I found the recipe. http://bakerlady.wordpress.com/2010/12/28/melting-moments/#more-1808

Melting Moments
13 T butter, softened (if using unsalted butter, add 1/4 teaspoon fine table salt with the butter)
1/3 cup, lightly packed powdered sugar
3/4 teaspoon vanilla extract
1/4 cup cornstarch
1 1/3 cups plus 1 tablespoon all purpose flour
Lemon Filling
3/4 cup, very firmly packed powdered sugar
4 T butter, softened
3 1/2 teaspoons fresh lemon juice
Preheat oven to 300°. Line two large baking trays with parchment paper.
Using an electric mixer or electric hand-held beaters, beat butter, sugar and vanilla together until creamy. Stop the machine and use a spatula to scrape down the side and base of the bowl. Continue beating until the mixture is completely smooth. Add cornstarch and beat until combined. Add flour and beat until just combined. Roll into one inch balls and place on prepared baking sheets. Use a flat surface (such as the base of a glass) to gently flatten the balls to form discs. Press a fork into each disk making small indentations. Bake for about 20 minutes, until cookies are golden on the underside and just firm to the touch. Cool cookies on trays for 10 minutes. Then transfer to a wire rack to cool completely. Make the lemon filling. Place a heaped teaspoon of the filling on the flat side of one biscuit. Top with the flat side of another cookie and gently press together. Repeat with remaining cookies. Store cookies in an airtight container at room temperature, in the refrigerator or freezer.
Lemon Filling
Using an electric mixer or electric hand-held beaters, beat powdered sugar, butter and lemon juice together until smooth and creamy.
**As you can see by the picture the filling didn't set up. Hopefully if you try these, your filling will set up right. If you want to see how they should really look here is the link to the page where I found the recipe. http://bakerlady.wordpress.com/2010/12/28/melting-moments/#more-1808
Reese Dessert
This recipe is something that was served at my school, let's just say twentysomething years ago. It was always on the menu as Reese Dessert. But after getting the recipe it could just be called peanut butter dessert. Whatever you call it it is good.
I'm going to type it as it was written as I think it will be easier. It is a recipe that is done in steps.

Reese Dessert
2 cups graham crackers, crushed
1/4 cup melted butter
1/4 cup peanut butter
1/4 cup powdered sugar
Mix all together, press into a 9 x 13 pan. Freeze until set.
2 cups peanut butter
1/4 cup melted butter
1 cup powdered sugar
Mix together, add enough vegetable oil to spread easily. Spread mixture over crust. Return to freezer until set.
Cover with 2 cans Thank You brand chocolate pudding.
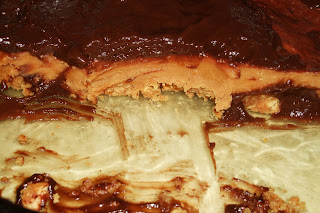
**Since my blender decided to die this week I just pounded to crush the graham crackers. I didn't do a great job, had several pieces that were still a little large. When I put them into a 9 x 13 it just seemed like way too little. So I transferred them to a 9 inch square pan. Seemed like a better fill.
**As you can see by making it in a 9 inch pan the peanut butter layer is a little thick.
**I didn't use Thank You brand. I just made two of the small boxes of instant pudding mix. But after starting to spread it on, I only used about have, so one box should be good if using the 9 inch pan. Of course those who actually had this in school said it was good, but the pudding just wasn't the same. Note to self: next time don't be so frugal (ok cheap) buy the Thank You brand.
**My suggestion to cut corners would be to get a ready made pie crust. I think cutting the recipe in half would fit the crust ok. I think I will try it next time, of course with the Thank You brand chocolate pudding.
I'm going to type it as it was written as I think it will be easier. It is a recipe that is done in steps.

Reese Dessert
2 cups graham crackers, crushed
1/4 cup melted butter
1/4 cup peanut butter
1/4 cup powdered sugar
Mix all together, press into a 9 x 13 pan. Freeze until set.
2 cups peanut butter
1/4 cup melted butter
1 cup powdered sugar
Mix together, add enough vegetable oil to spread easily. Spread mixture over crust. Return to freezer until set.
Cover with 2 cans Thank You brand chocolate pudding.

**Since my blender decided to die this week I just pounded to crush the graham crackers. I didn't do a great job, had several pieces that were still a little large. When I put them into a 9 x 13 it just seemed like way too little. So I transferred them to a 9 inch square pan. Seemed like a better fill.
**As you can see by making it in a 9 inch pan the peanut butter layer is a little thick.
**I didn't use Thank You brand. I just made two of the small boxes of instant pudding mix. But after starting to spread it on, I only used about have, so one box should be good if using the 9 inch pan. Of course those who actually had this in school said it was good, but the pudding just wasn't the same. Note to self: next time don't be so frugal (ok cheap) buy the Thank You brand.
**My suggestion to cut corners would be to get a ready made pie crust. I think cutting the recipe in half would fit the crust ok. I think I will try it next time, of course with the Thank You brand chocolate pudding.
Tuesday, October 4, 2011
Parmesan Crusted Chicken
I can across this recipe at Hellmanns.com. Four ingredients and one of those is the meat itself. Super easy and tasty. Of course they push for their name brand mayonnaise. I used the salad dressing type (Miracle Whip for example) that most people generically call mayonnaise. I served it with onion rings with dipping sauce, but would be great with any vegetable.

Parmesan Crusted Chicken
1/2 cup mayonnaise
1/4 cup grated Parmesan cheese
4 boneless, skinless chicken breast halves
4 tsp Italian seasoned dry bread crumbs
Preheat oven to 425 degrees. Combine mayonnaise and Parmesan cheese in medium bowl. Arrange chicken on baking sheet. Evenly top with mayonnaise mixture, then sprinkle with bread crumbs. Bake 20 minutes or until chicken is thoroughly cooked.

**I spread on a little too much of the mayonnaise mixture. Although it was good, it was a little thick.
**I would also suggest giving the bread crumbs a gentle pat into the mayonnaise mixture. While cutting the meat I was losing crumbs.
**Be sure to check your chicken for doneness. I had one breast that was fairly thick and was not done at the 20 minute mark. Since Corey likes his food well done, I gave it an extra 15 minutes.

Parmesan Crusted Chicken
1/2 cup mayonnaise
1/4 cup grated Parmesan cheese
4 boneless, skinless chicken breast halves
4 tsp Italian seasoned dry bread crumbs
Preheat oven to 425 degrees. Combine mayonnaise and Parmesan cheese in medium bowl. Arrange chicken on baking sheet. Evenly top with mayonnaise mixture, then sprinkle with bread crumbs. Bake 20 minutes or until chicken is thoroughly cooked.

**I spread on a little too much of the mayonnaise mixture. Although it was good, it was a little thick.
**I would also suggest giving the bread crumbs a gentle pat into the mayonnaise mixture. While cutting the meat I was losing crumbs.
**Be sure to check your chicken for doneness. I had one breast that was fairly thick and was not done at the 20 minute mark. Since Corey likes his food well done, I gave it an extra 15 minutes.
Subscribe to:
Posts (Atom)